Authorization refers to the proccess of giving an app or user permission(s) to access certain resources or
perform specific actions within a system (here yutify).
And yutify implements OAuth 2.0
authorization framework for this purpose.
The access to the resources is controlled by scopes, and simple enough,
yutify provides only one scope:
activity: view a user's listening activity on linked service(s).
The authorization process requires valid client credentials: Client ID and
Client Secret. So, if you haven't, you may follow the Apps Guide to create an app and obtain these
credentials.
The OAuth 2.0 Authorization Framework defines four main grant types for
obtaining access tokens, however,
yutify implements only the following grant types or flow:
- Authorization Code
- Authorization Code with PKCE: This is an extension of the Authorization Code flow that adds
an additional layer of security by using a code verifier and code challenge. It is recommended for public
clients (e.g., mobile apps) or where the client cannot securely store a client secret to prevent
authorization code interception attacks.
So, let's go through them one by one and learn how to implement them in your application to access protected
resources on yutify.
Prerequisites
Before we start, I assume that:
- You have created an app following the Apps
Guide. Make sure to add
http://localhost:3500/callback as redirect URI.
- You have basic understanding of either Python or JavaScript programming language.
Authorization Code
This involves redirecting the user to a login page, where they can
authorize the application to access their data. After authorization, the application receives an
authorization code that can be exchanged for an access
token.
Setup
Create a new directory for your project (e.g. mkdir auth_code && cd $_) and set up a basic Flask
application.
Final directory structure:
auth_code/
    app/
        templates/
            base.html
            index.html
        __init__.py
        routes.py
    .env
    app.py
Install dependencies:
pip install flask requests python-dotenv
Update .env file:
# auth_code/.env
CLIENT_ID=<your_client_id>
CLIENT_SECRET=<your_client_secret>
REDIRECT_URI=http://127.0.0.1:3500/callback
Update routes.py:
# auth_code/app/routes.py
from flask import Blueprint

main = Blueprint("main", __name__)

@main.route("/")
def index():
    return "Hello, World!"
Update __init__.py:
# auth_code/app/__init__.py
from flask import Flask


def create_app():
    app = Flask(__name__)

    # Change this to a secure key in production
    app.config["SECRET_KEY"] = "potatoes"

    # Import and register blueprints
    from app.routes import main
    app.register_blueprint(main)

    return app
Update app.py:
# auth_code/app.py
from app import create_app

app = create_app()


if __name__ == "__main__":
    # Run the Flask application
    app.run(port=3500, debug=True)
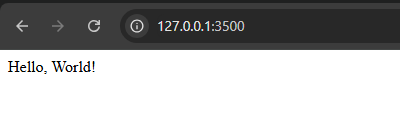
Now run following command to make sure our Flask application works:
python app.py
You should see the Flask development server running on http://127.0.0.1:3500. Open this URL in
your browser, and you should see a simple "Hello, World!" message.
Pheew! With the basic setup done, we can now proceed to implement the Authorization Code flow. 😺
Request User Authorization
The first step in the Authorization Code flow is to request authorization from the user so that our app can
access
their data. This is done by redirecting the user to the authorization endpoint with the following parameters:
| Parameter |
Description |
client_id |
Your app's Client ID obtained from the dashboard. |
redirect_uri |
The URL where the user will be redirected after authorization. It must match one of the redirect
URIs
specified in your app settings. |
response_type |
Must be set to code to indicate that we are requesting an authorization code. |
scope |
The scope of access you are requesting. As stated above, you would use activity. |
state |
An optional parameter that can be used to maintain state between the request and callback. It is
recommended to use it to prevent CSRF attacks. |
So, the final URL will look something like this:
https://yutify.cheapnightbot.me/authorize?client_id=<YOUR_CLIENT_ID>&redirect_uri=<YOUR_REDIRECT_URI>&response_type=code&scope=activity&state=<STATE_STRING>
To implement this in our Flask app, we will create a new route that redirects the user to the authorization
endpoint with the required parameters.
Update routes.py:
# auth_code/app/routes.py
import os
import secrets

from dotenv import load_dotenv
from flask import redirect, session ... # Existing imports ...

load_dotenv()

BASE_URL = "https://yutify.cheapnightbot.me"

... # Existing code ...

@main.route("/authorize")
def authorize():
    """
    Redirect the user to the authorization endpoint
    to ask for permission to access their data.
    """

    auth_endpoint = "/authorize"

    client_id = os.getenv("CLIENT_ID")
    redirect_uri = os.getenv("REDIRECT_URI")
    response_type = "code"
    scope = "activity"
    state = secrets.token_urlsafe()

    # Store the state in the session for later validation
    session["state"] = state

    # Construct the authorization URL with the necessary parameters
    authorization_url = (
    f"{BASE_URL}{auth_endpoint}?client_id={client_id}&redirect_uri={redirect_uri}"
    f"&response_type={response_type}&scope={scope}&state={state}"
    )

    # Redirect the user to the authorization URL
    # This is where the user will be asked to grant or deny access.
    return redirect(authorization_url)
Now, we can test this route (i.e. authorization) by running our Flask app (python app.py) and
navigating to http://127.0.1:3500/authorize in
your browser.
You should be redirected to the authorization page of yutify, where you can
log in and authorize your app to access your data.
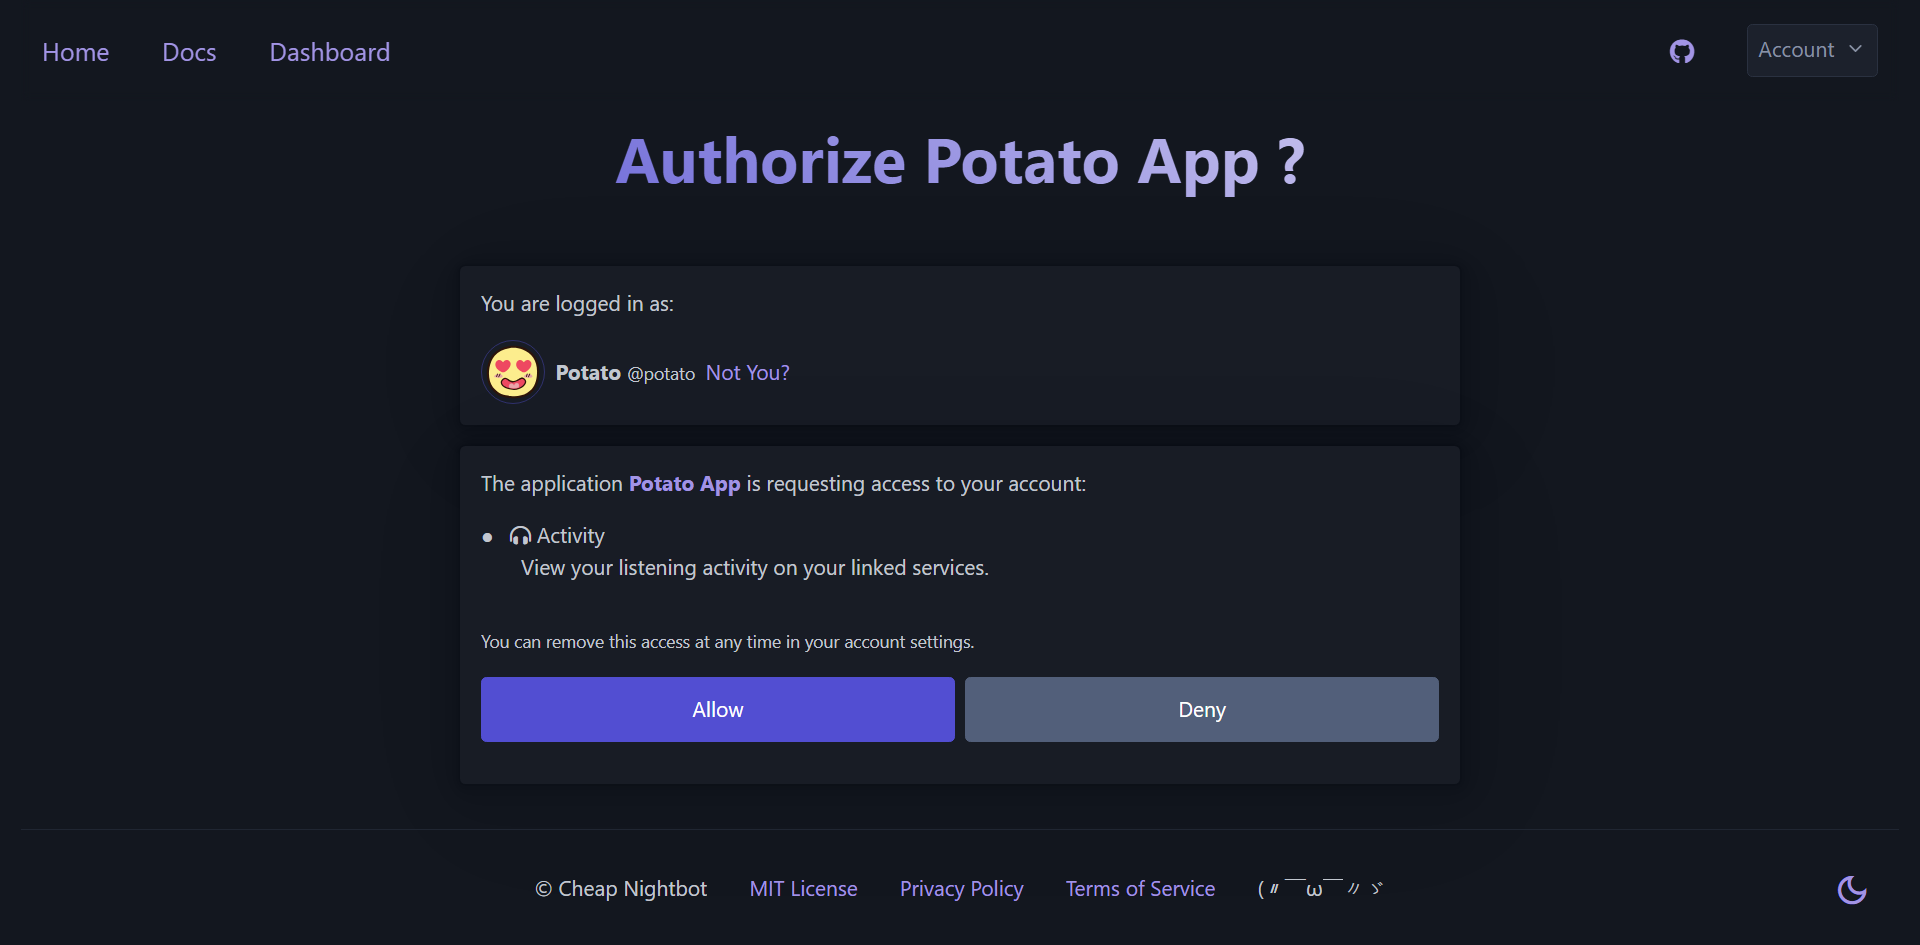
Before moving forward and authorizing the app, let's first deny the app access to our data and see what
happens. So, go ahead and click on the "Deny" button on the authorization page.

Notice we are redirected to the redirect_uri specified in our app settings, which is
http://127.0.1:3500/callback in this case. And also notice that the URL contains following query
parameters:
error: Indicates that the user denied the authorization request.error_description: Provides a description of the error.state: The state parameter we sent in the authorization request to prevent CSRF attacks.
Now go to http://127.0.1:3500/authorize one more time, and this time click on "Allow"
button to grant the app access to your listening activity.
You will be again redirected back to the redirect URI specified in your app settings:

This time notice that the URL contains following query parameters:
code: The authorization code that can be exchanged for an access token.state: The state parameter we sent in the authorization request to prevent CSRF attacks.
Did you notice in both cases (denying and allowing the app access), the page says "Not Found"? Yes, that's
because we haven't implemented the callback route yet to handle the redirect/callback after authorization.
And before we do that, let's create a simple HTML template with a link to authorize route so that we can
easily test the authorization flow.
Create base.html in templates directory with the following code:
<!-- auth_code/app/templates/base.html -->
<!DOCTYPE html>
<html lang="en">

<head>
    <meta charset="UTF-8">
    <meta name="viewport" content="width=device-width, initial-scale=1.0">
    <link rel="stylesheet" href="/static/style.css">
    <title>yutify OAuth 2.0 Example</title>
</head>

<body>
    <header>
        <h1>yutify OAuth 2.0 Example</h1>
        <p>Welcome to the yutify OAuth 2.0 example application!</p>
    </header>

    <main>
        {% block main %}{% endblock %}
    </main>
</body>

</html>
Create index.html in templates directory with the following code:
<!-- auth_code/app/templates/index.html -->
{% extends "base.html" %}

{% block main %}
<h2>
    Step 1, Request User Authorization:
</h2>
<a class="btn" href="{{ url_for('main.authorize') }}">Authenticate with yutify</a>
{% endblock %}
Update routes.py to render the index.html:
# auth_code/app/routes.py
... # Existing imports ...
from flask import render_template ... # Existing imports ...

@main.route("/")
def index():
    return render_template("index.html")

... # Existing code ...
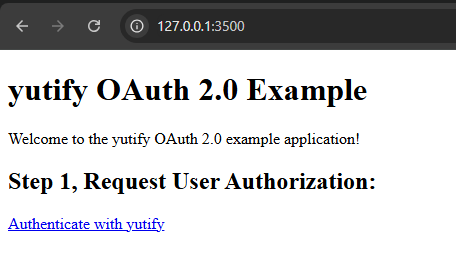
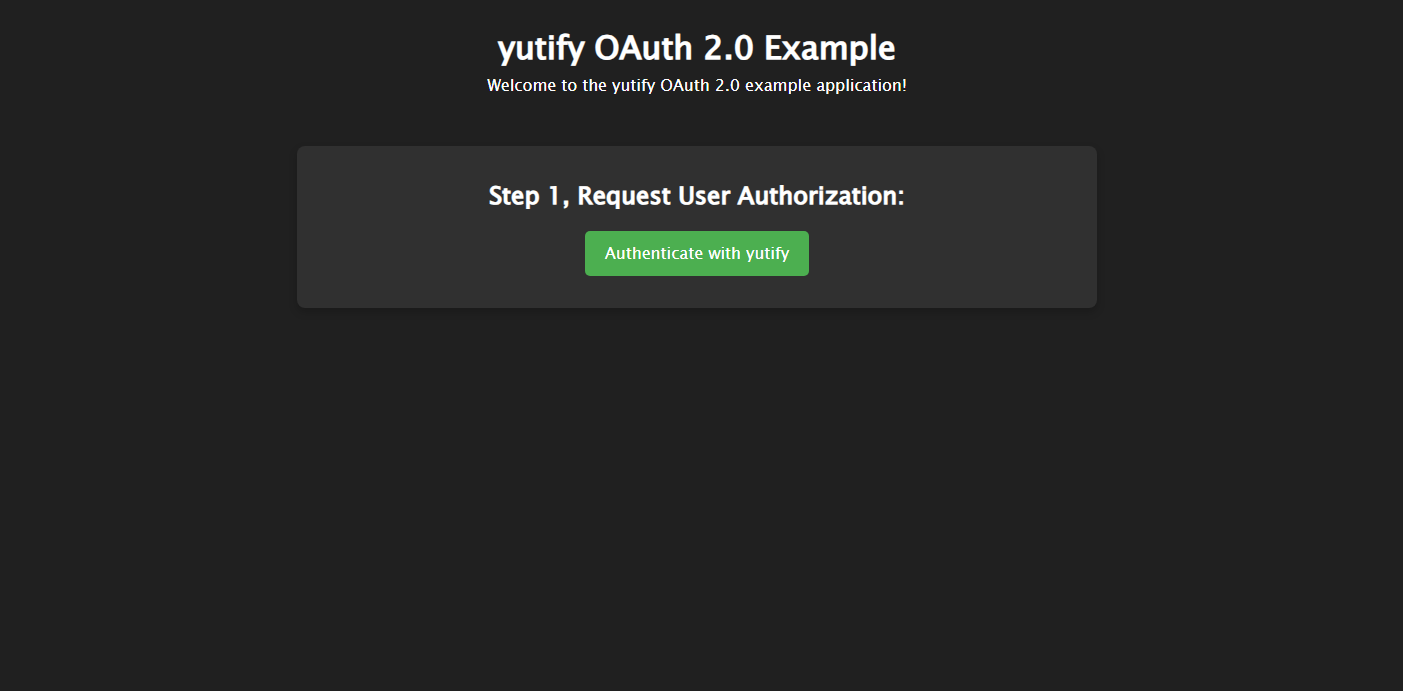
Run the Flask app again if you stopped it and navigate to http://127.0.1:3500, you should see a simple page with a link
to authorization route:
While, we are here, let's also add a simple CSS styling to make the page look better.
Create style.css in static directory with the following code:
/* auth_code/app/static/style.css */
* {
    margin: 0;
    padding: 0;
    box-sizing: border-box;
}

body {
    font-family: 'Lucida Sans', 'Lucida Sans Regular', 'Lucida Grande', 'Lucida Sans Unicode', Geneva, Verdana, sans-serif;
    background-color: #202020;
    color: #ffffff;
    padding: 1rem;
    display: flex;
    flex-direction: column;
    align-items: center;
    justify-content: center;
    gap: 1rem;
    margin-top: 0.5rem;
}

header {
    width: 100%;
    text-align: center;
    margin-bottom: 2rem;
}

main {
    width: 100%;
    max-width: 800px;
    padding: 2rem 1rem;
    background-color: #303030;
    border-radius: 8px;
    box-shadow: 0 4px 8px rgba(0, 0, 0, 0.2);
    display: flex;
    flex-direction: column;
    align-items: center;
    justify-content: center;
    gap: 1rem;
}

.btn {
    display: inline-block;
    padding: 10px 20px;
    background-color: #4CAF50;
    color: white;
    text-decoration: none;
    border-radius: 5px;
    cursor: pointer;
}
Now, if you refresh the page, you should see the updated styles applied to the page:
Okay with basic HTML template with CSS styling out of our way, let's get back to implementing and handing the
"callback"!
Update routes.py:
# auth_code/app/routes.py
from flask import abort, request ... # Existing imports ...

... # Existing code ...

@main.route("/callback")
def callback():
    """
    Handles the callback from the authorization server.
    This is where the user is redirected after granting or rejecting the access.
    """

    # Retrieve the state and code from the query parameters
    # and validate the state from the session.
    if "state" not in session:
        abort(400, "State not found in session!")

    state = session.pop("state")
    received_state = request.args.get("state")

    # Validate the state
    if state != received_state:
        abort(400, "State mismatch. Possible CSRF attack!")

    code = request.args.get("code")
    error = request.args.get("error")
    if error:
        msg = request.args.get("error_description", "An error occurred during authorization.")
        abort(400, f"Authorization error: {msg}")

    # TODO: Process the authorization code (i.e., exchange it for an access token)
    return f"Authorization successful! Code: {code}"
The code is self-explainatory, but if you are not sure, expand this by clicking for a brief
explaination!
-
In the first
if statement, we are checking if the state exists in our
Flask session. As we know in the authorize() view function, we set / saved the state
string, so if it is not there by the time we reach the callback() view, there might be
something wrong, and we should not proceed with the further authorization flow.
-
Then, if that first
if statement was False, we know that we can safetly
retrieve the state string from the session. So, we are doing just that in the next line of code and
also retrieving the state recieved from the authorization server (i.e. yutify) in the
state and recieved_state variables respectively.
-
The next
if just compares if the state from our session and the one returned by the
authorization server matches or not. Again, if the state does not match, we should immedietly abort
the authorization process.
-
If the states did match, we try to retrieve the authorization "code" and/or "error" returned by the
authorization server from the query parameters (remember from above that we get those key-values in
the URL query parameter?). Notice we are using
request.args.get() for both, and it will
either return the values or None if they don't exist in the query parameter.
-
Then, first we check if the
error contains value (i.e. it is not None),
which means the authorization server returned error and the user most probably denied the access
(there might be other reasons as well, like bad request or query parameters). So, if that is the
case, we again abort the authorization flow as there nothing to do left.
-
Phew! After all that checking, if everything went well, by this point we will have authorization
code in
code variable. For now, we are just showing that code in the HTML body.
You should see the the code returned by the authorization server (i.e. yutify) on the HTML body and of
course like before, in the URL:

We need to exchange this code for an access token. That is, we will be sending this code back to yutify
with our client credentials and it will return an access token along with a refresh token. We can use access
token to access protected API endpoints (i.e. /api/me) by sending this
access token
with each API call to that endpoint. And the refresh token can be used to get a new access token after it
expires (which is 3600 seconds or 1 hour, see Tokens for
more information).
Okay, before we complete our TODO of exchanging the code for an access token, let's update our template and
view to return HTML instead of just plain text: